Wednesday, September 19, 2012

First Afternoon Tea at Kenilworth


IMG_3857

Over the years, I’ve bought lots of different tea cups and saucers and dishes – and it doesn’t matter to me whether they all match or not!  But they are all pretty and dainty, some with tiny pink flowers, some with shades of lilac or blue.

IMG_3852

When the older girls were little, I would sometimes set aside normal household things so we could have a tea party.  Sometimes we dressed up, sometimes we didn’t.

But there have usually been sandwiches…

IMG_3859

                                                       maybe fruit…

            IMG_3863

                                         But of course there has always been tea!

                              IMG_3860

Properly drank with a raised pinky.

IMG_3865

And of course lots of sugar…. even brown sugar!

                    IMG_3861

The girls have gotten a little fancier than I ever did, and now there are even menus in beautiful font which list the delicacies served that day – and the name of each guest at the top of their menu.

I’m not sure you can read it – but this one is mine, and I am “Queen Kelly”.

IMG_3858

Alix and Kate took full charge of our first Tea here yesterday!  And a delightful, memorable time was had by all!


IMG_3862         


                         IMG_3866


IMG_3864


The boys were not at home during this time, but they arrived just as we were finishing up and were very happy to see food – especially the chocolate covered honey twist pretzels!

Saturday, September 15, 2012

Finished Floors

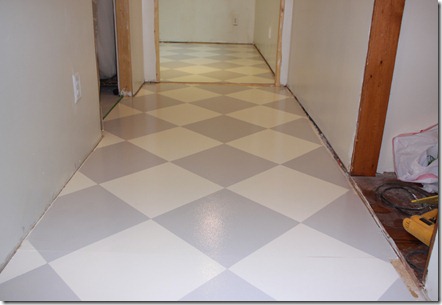
Last night I put the final coat of polyurethane on the floors.  They’re done!  Let me take you through the process of how we did it.

Here are Glenn and I marking the lines for the diamond grid in the mudroom and hallway.  Later, I taped off each alternate diamond just outside the lines. This way, I could cover up our pencil marks, plus it was the only way we could paint each diamond completely, since the tape was overlapping the adjacent diamonds.

I wanted the pattern to be in a size consistent with the room, not too large, not too small.  So we figured 15” square would be just right.  We marked the center of the room by using a measuring tape, and then determining how far to mark the corners from it by using the old Pythagorean Theorem.  If you’re not sure what I’m talking about, call Glenn!  Smile  (hint: a2 + b2 = c2 )

Glenn used a 4 foot ruler for the main lines, and I got into the corners and edges with my yardstick.


IMG_3814


                       Here are the first set of diamonds, with 2 coats of paint. 

                     IMG_3815

                      Here is Kate pretending she’s on a hopscotch board.

IMG_3823


Now it was time for the remaining ones.  To paint the diamonds, (some may call them squares) I used a small foam roller brush with a straight edge.  I bought it in the paint department specifically for the diagram.

You may have noticed that in almost any shot of me working at Kenilworth, I am wearing my blue “uniform”.  Let me assure you I washed the shirt and sweats nightly because they are the only clothes I have that are paint/work worthy.  I don’t wear T-shirts often, so I don’t have any others.  And these sweat pants are lightweight, so I can wear them even when it’s hot.  (probably not necessary to explain all that, but by now even my nieces have noticed I’m almost always wearing this outfit when they come by Kenilworth, not to mention all the Menards employees who I’m sure wouldn’t recognize me if I wore anything different to the store.)


IMG_3818


On to more important things… like the results!


           IMG_3842


IMG_3831


                                                                                                                                                                          IMG_3843


IMG_3844


We love it!


For the master bedroom I wanted something different than the hallway.  I started to make my  own stencil, but the stencil paper we purchased was packaged in a tightly rolled up tube!  Not a great packaging idea, MS!  It never would flatten out, even after our huge dictionary sat on it all night.  So Glenn blessed me by helping me pick out a pre-made stencil from http://www.stencilease.com/   They had a great selection and were able to overnight the stencil I picked out.  It is called Magnolias.


IMG_3828

Alix helped me a lot with this project.  We started in the middle of the room, and went on a diagonal across the floor.  There are tiny triangle marks on the four corners of the stencil, which we used to help us keep it lined up straight as we went.

IMG_3836

Like anything, I learned as I went.  For instance, it is best to use a light touch on the paint – I ended up using less paint on the roller, and not covering some parts as thoroughly as others.  This helped me achieve a more faded kind of look, less uniformity in the thickness of the paint than what I had done for the diamonds in the mudroom.

IMG_3841

I also learned that occasionally during the process, the stencil has to be washed off.  Otherwise, the paint begins to dry in between the cut outs and the pattern doesn’t come out as clearly on the floor.

I just took it outside and hosed it off a couple of times, then dried it with a towel and went back to work.


                        IMG_3840

I covered the diamonds with 3 coats of poly, and our room with 2.  I didn’t think 3 was necessary for our room, since we won’t have as much foot traffic.  I had planned to do just one, but my dear friend convinced me I should do 2.  Smile  She was right, and I’m glad I did.

We’ll let the floors “cure” for 3 days, and then Monday we’ll move the rest of the things here!  Hooray!

Friday, September 14, 2012

Starting Point

I’ve been making some progress on the floors this week.  They all have 2 coats of porch paint over the primer now. 

This is the project I have been waiting for!  I’m so excited about it.

For the master room, bathroom, and closet, I decided to mix the paints.  I had initially bought light gray and white.  But when I opened the light gray, it just wasn’t quite my idea of light gray.  The laundry room was the first floor I painted in the new area.  Seeing that I needed to alter the paint color a bit, I mixed equal parts white and gray.  Here is how it turned out:


   IMG_3596

In the picture, there seem to be little white flecks, but that is just on the photo, not on the floor. 

In the shot below you can see it in a slightly different light:

                                                       IMG_3615

I liked the color for the laundry room, but I knew I wanted a lighter version for our room.  So I decided to mix 2 parts white to 1 part gray.  It was just right!


        IMG_3717


IMG_3719


You might wonder which precision measuring tool I used to measure the paint.  It’s both practical and accurate.  It’s this handy plastic cup!

                                                       IMG_3694

I just filled each color to about the same spot near the top of the cup, then used a wooden paint stick to scrape the excess into my mixing bowl, an old gallon ice cream container that we’ve been using when we clean the floors.  Mix it all up together, pour it into a paint pan, and you’re set!  Afterwards, wash everything out with the hose, let dry, and reuse it.  Admittedly, I didn’t rinse the cup.  I have lots of those.


For the mudroom and hallway I have a different plan for the design.  For the 2 base coats, I asked the Menards paint employee to tint my gallon of white porch paint the same color as my wall and trim paint – Crisp Linen.  Now this may seem a little perfectionistic (even though I have already denied being so), but I wanted a nice seamless, cohesive look.  A creamy white on the walls and trim and a stark white on the floor would have been noticeably different in the final look.  At least to me.


      IMG_3728


It was just what I wanted.  And it makes touch ups so easy!  This way I can touch up the wall with the floor paint, the floor with the trim paint, and the trim with the wall or floor paint!  I’m simple that way.


                                      IMG_3729

The strip between the mudroom and hallway will have a narrow threshold piece which I will be able to paint over to incorporate into the floor design.

Porch paint comes in different finishes, just like wall paint, but I chose semi-gloss because I wanted a shiny look on the floor.  That just looks clean to me!

This action shot of Isabella and Olivia shows how much they are already enjoying the new clean floor!

IMG_3731


More soon!  Have a great day!