Tuesday, October 28, 2014

Building a Banquette


Glenn surprised me last month!  He built a kitchen banquette for us!  We had talked about it for many months, going over the details we both felt were important.  For instance, we wanted it to wrap around the corner of the wall, to get the maximum potential of people (particularly little people) at the table.  We often have families here for meals, and the extra seating really makes a difference.

Glenn wanted the banquette to have plenty of room for legs, so that we wouldn’t bang them up sliding in and out.  And he wanted there to be plenty of depth to the seat so as to accommodate bench sitters comfortably.  We both wanted some pretty molding on the sides, but not too much since they wouldn’t be in the limelight.  The other thing Glenn wanted was for the seat ledge to be far enough over the base that we had plenty of room to bend our legs in a natural position.  Sometimes, we’ve seen banquettes that have such a narrow space between the lip of the seat and the base that folks sitting on the banquette have to keep their legs at almost right angles.  Not exactly comfortable if you’re sitting for any length of time!

He thoughtfully took lots of pictures during the building process, in case someone wanted to duplicate the look.  So this is a picture heavy post.

Now that we have been using the banquette for a month, what do we think of it?

We LOVE it!  Really.  It has already proved its worth.  And not only that, it’s pretty, too. 

Here’s how things looked before:

IMG_4924

 IMG_4925


Here is how Glenn built it, step by step:


He cut one of the boards the width of the seat for one leg of the banquette. 

IMG_4926


Placed the board on two of our chairs to check for desired height of the finished seat.

IMG_4930


Uh oh.  Old house = crooked walls.  A teeny little gap in the corner.

So Glenn measures the gap.

IMG_4932


In both directions of course.

IMG_4933


A quick fix – he didn’t want to reduce the depth of the first piece so he cut the second longer than planned and angled the edge against the wall to close the gap and then cut the first to reduce its length by the width of the new piece.

IMG_4934


That’s better!

IMG_4936


Back outside to the ….. work shop… to cut the frame.

IMG_4929


A 2 x 4 is anchored to the studs to provide support for the back.

IMG_4937


Looks like some people ate lunch while Glenn slaved away at the banquette.

 IMG_4939


Mitered corners.

 IMG_4938


He ran electrical wires so we could have outlets, conveniently, at either side.  Especially helpful for the kids when they are vacuuming after meals. ;)

 IMG_4944


Glenn used his biscuit cutter to make grooves for these cute little “biscuits” which joined the flat surfaces so they would line up, otherwise the edges of the panels wouldn’t be flat and smooth.

 IMG_4946


He used the cutter to make these grooves at even intervals, inserted the biscuits and a little glue for good measure.

IMG_4945


Pushed the ends together…

IMG_4949


And voila!

IMG_4943


He had to cut a narrow lip where the stair trim covers the wall.

              IMG_4935    


Then he screwed the tops to the frames.  These are stainless steel trim screws, the heads are small so less wood putty is needed.

IMG_4951


He added some pretty baseboard molding under the seat and at the floor, sanded the edges of the seat smooth, and caulked the lines where it meets the wall.

IMG_4952


He even found outlet covers which match the other ones we have in the house.

IMG_5016


I primed and painted, of course! 


And here it is!

DSC00431


DSC00421


DSC00433


The old, antique table we’ve had for years is perfect for the banquette, since it is rectangular shaped, but has slanted corners. 

  DSC00423


One more of our Kenilworth goals checked off the list! 

Now I just need to find the right sized jute rug to warm it up a little. 


Before

      IMG_4924

After

            DSC00436        


Saturday, October 25, 2014

Antique Doors and Book Page Wreaths


IMG_5248 

Several weeks ago, I found these doors listed for free on CL.  I was so excited! 

For a while I have been picturing 2 old, paneled doors in our family room, and these would work perfectly.

They were in great shape structurally, very sturdy and heavy, but they were different colors and had some very old paint which was peeling and crackled in the extreme. I used a hand sander on them, and then painted both sides with some white semi-gloss paint. 

DSC00400


I leaned them up against the wall behind one of the sofas.  Although I really liked them, something seemed to be missing.  But I left them there for a while, until I could figure it out.

One day, when I walked into the family room, it struck me that book page wreaths might look really good hanging on the doors.  I remembered pinning directions for a book page wreath at some point, to one of my Pinterest boards.  The tutorial was great, here it is in case you want to try one yourself - http://makelyhome.com/librarians-please-avert-your-eyes/   I loved how they turned out.


DSC00394


First I picked up the 2 wreath forms for 99 cents each from the Dollar Store.  Then I found a small paperback book at GW for 99 cents.  I used it for one door, and another paperback of similar size which I already had for the other.  The book wasn’t a keeper, so I didn’t feel badly about tearing it apart. In fact, I read a little of it as I was folding the pages, and had no doubt I was giving it more dignity by turning it into a wreath. 


DSC00402


Two suggestions I would give for anyone wanting to try one:

Paint the outside edges of the books with some craft paint, like the author in the tutorial suggests.  (of course you’ll need to wait until the paint dries to begin the wreath, but the paint will give a nice overall look when the wreath is complete.  I used a dark gray for mine.)


DSC00208


The other thing is to make sure you have plenty of glue sticks!  I bought a new package, and used at least half of it, if not more.


To hang them on the doors, we used small picture hangers, and secured them to the doors.  Then I used hot glue to attach a loop of jute string to the back of the wreaths; I slipped the loops over the hangers.  That was it!


I love the texture they add to the family room, and the “color” complements the neutral feel of the room.


DSC00404


I imagine there are limitless variations you could try with these wreaths!


DSC00408


I think Noah, in particular, is pretty impressed with them.


Sharing with

Prodigal Pieces Linky Party 

Mod Mix Monday

Wednesday, October 1, 2014

The Smallish Table Gets a Makeover


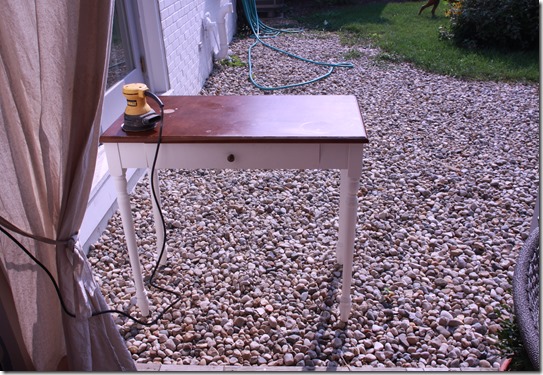
Remember this smallish table I was given last August?  At the time, I didn’t know exactly how I wanted to finish it, so I just sanded the top and left it as is.

Since then, I’ve had a little more time to consider it.  So a couple of weekends ago I got out some paints and my trusty Purdy brush and sat down in the dining room in front of the little table.


IMG_5116


I sanded it a little, then started layering paint colors.  First I painted on the same gray as our bathroom vanity. But it was a little too dark.


IMG_5114


Next I dry brushed the white trim color over sections of it, to try to make it look a little more antique.


IMG_5112


It still wasn’t quite what I had in mind, so I took another lighter gray color and dry brushed that over the body of the table as well. 


IMG_5117


At last! I felt like it was getting closer to what I pictured. 

Finally I dry brushed smaller sections in an almond color I had in my paint stash.  It warmed it up just a little and seemed to help blend all the layers.


IMG_5118


With all these applications of paint, I had left the top unfinished.  That’s because I knew from the start of this makeover that I wanted it to be just one color – white.


After all that?

I’m happy. 

The layered paint gives it an older look, and the colors really make the pretty knob stand out better than before.


IMG_5121


Once I finished painting the top, I lightly distressed it, then used two coats of Johnson’s clear paste wax to seal it. 


Well, what do you think?


                     IMG_5125                   


Before and After

                 IMG_3177       

          IMG_5124


Sharing with Miss Mustard Seed!